Eat Your Veggies

This spring I will visit my adorable almost one-year old niece. I've been thinking about what to bring her and decided to make her some veggies since she's the only baby I know who actually likes eating her broccoli.

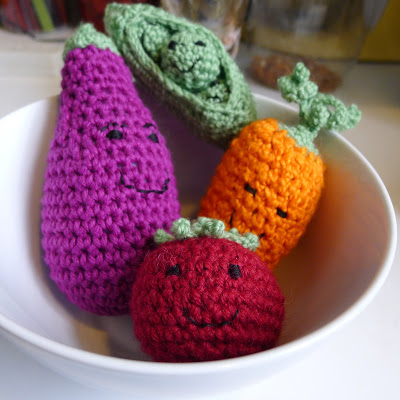
May I introduce: Madame Aubergine, the adorable pea-pod triplets Henri, Jaques, and Felix, Grand Mere Carotte, and Tante Tomato. They will soon be joined by Monsieur Brocoli.

This nutritious bunch would have not come into being without the generous contributions of these fellow bloggers who shared their patterns.

The pea-pod triplets are based on a pattern by Yarrn. Grand Mere Carotte is part of a collection of Easter themed patterns by Midnight Knitter. Madame Aubergine's pattern was provided by Lion Brand a long time supporter of our team.

I more or less made up the tomato on the fly. It's a basic amigurumi ball

For the Fruit

  • Chain 2
  • 6 sc in first ch.
  • 2 sc in each stitch - 12 st
  • *sc, 2 sc in next stitch* repeat - 18 st
  • *sc, sc, 2 sc in next stitch* repeat - 24 st
  • *sc, sc, sc, 2sc in next stitch* repeat - 30 st
  • Crochet 3 rounds of sc in each stitch
  • *sc 2 together, sc, sc, sc* repeat - 24
  • *sc 2 together sc, sc* repeat - 18
  • *sc 2 together sc, s* repeat 12 (at this point you probably want to start stuffing the tomato before the opening gets too small)
  • *sc 2 together* repeat 6
  • Sew up the top

For the leaf

  • Chain 2
  • 5 sc in first stitch
  • Crochet 2 rounds of sc
  • 2 sc in each stitch - 10 stitches
  • *sc, 2 sc in next stitch* repeat - 15 stitches
  • *sl, chain 8, sc in 7th chain and work a total of 6 sc back down the chain, sl, sl* 5 times.

Sew the leaf to the top and embroider the face onto the tomato.

Have fun

Tutorial: Stenciled Spring Shades

It seems that every time we upgrade something around the house another project is calling out to me. After we painted our kitchen, it was painfully obvious that we needed new window shades. It was equally obvious that these shades had to fit a minuscule budget. In the end I decided on plain white, stenciled shades - one of a kind, within budget, perfectly matched to the new color scheme!

Instructions

What you need:

  • A plain shade. The big box stores will cut it to size for you.
  • Acrylic paint. I used leftover paint from my kitchen "remodel" and a paint sample
  • Stencils (Thank you Martha)
  • Spray mount
  • Sponges to sponge on the paint and something to pour the paint into

The Process

Roll out the shade and place it on your work surface. Because I'm lazy I only stencil the shade to fit the actual window opening. I leave the part that no one will ever, ever see blank.

Lightly spray adhesive on the back of the stencil. (Do this in a place that's easy to clean up. There may be spray over and you don't want to get that on your shade.) Place the stencil on the shade flattening out the stencil.

Pour a little of the paint in a dish and dip your sponge in. At first use paint sparingly until you get a feel for how much you will need to cover the stencil. Starting from the middle of the stencil begin sponging on the paint.

Once you've covered the stencil with paint, carefully pull off the stencil and place it on a different part of the shade. You don't have to re-apply the spray mount. The back of the stencil should maintain its tackiness through the whole project.

Continue in this manner until you're satisfied with your project. I was using two colors and two stencils. First I stenciled all the large blue shapes, then I washed off the large stencil, re-applied some spray mount, and continued with the red paint. I used the same process to fill in the spaces between the large shapes using the smaller stencil.

One more window to go. . .

Tutorial: Repurpose Kid Art for a Mother's Day Gift

 
First of all, I want to thank Sarah of Sarah Jane. Her blog post of 2009 was the inspiration for this tutorial, which is a play on her original idea. Three years ago, Sarah decided to display her children’s art by cutting it into whimsical shapes and framing them.


I've always wanted to do something like this and I finally tackled a project that originated when my now fifth grader was in pre-school. In 2006 Elizabeth and Fiona were best friends. They did everything together including painting this masterpiece that used to hang on their classroom door in pre-school.


While the girls have gone their own ways, I wanted to preserve this piece in a way that they both could enjoy by turning it into TWO wall decorations.

Materials

  • Artwork
  • Stretched Canvas 
  • Acrylic paint 
  • Mod Podge or other decoupage medium 

Steps

Paint the top and side surfaces of the canvas in your preferred color.


While the canvas dries, cut up the artwork into a shape that you like. For this project, I used this stencil for the butterfly and this one for the cat. Sarah generously provided templates for a swallow, an elephant and a seal on her blog. You could also have your child draw a shape and use that.

When the canvas is dry, apply Mod Podge to the back of the image you cut out and glue it onto the canvas.
Then proceed to varnish the image by painting it with three coats of the Mod Podge. Let each coat dry (approximately 20 minutes) before applying the next layer.


If you decide to further decorate this piece and add the shape’s name like Sarah and I did, you can practice your penmanship while the glue dries and test out what you want to write on the canvas to complement the decoupage.
Once the decoupage is dry, finish of your piece by writing something fitting with acrylic paint using a very fine brush.
The butterfly will go to Fiona’s house and the cat will stay with my girl. This way they both can share a piece of the fantastic work they created when they were four.

By the way, Sarah is the designer of the Children at Play fabric line. Her work can also be found on Etsy at SarahJaneStudios.


Simone
groundsel.etsy.com