Hawaii Part II

I’m back from Hawaii with lots of new goodies!

My Hawaii trip fabric stash.

Rather than buying the typical souvenir, I prefer visiting local fabric stores to pick out prints that inspire me during my travels.  Everything was so beautiful there that it was hard to not overload my luggage with yards and yards of fabric!  I knew for sure I wanted some bold island prints to make into crop-tops and dresses so I could incorporate the Hawaiian vacation look into my wardrobe without looking tacky.  Sadly, the Hawaiian shirts I see in tourist shops just aren’t for me. 

Koa wood turtle buttons.

And with the strong Japanese cultural influence in Hawaii, I was also pleasantly surprised to find a great selection of intricate Japanese print fabrics!

Unfortunately, with working full time as a dentist, I barely manage to keep my Etsy shop running, so I’m super impressed that my fellow Moobowy partner (etsy shop collaboration with My Cute Bow) managed to complete a gorgeous kimono robe with the fabric she bought in Hawaii.

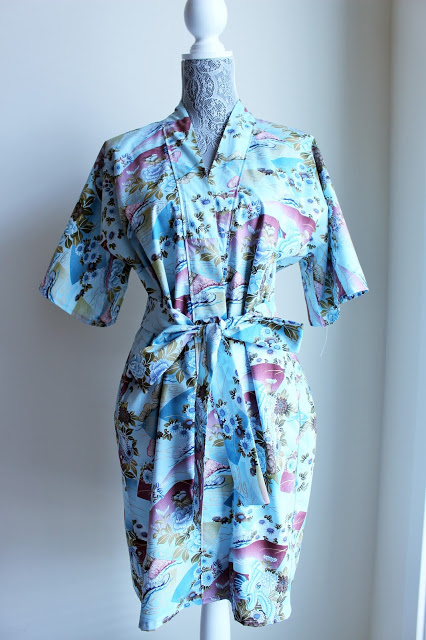
Check out My Cute Bow’s awesome DIY kimono robe tutorial here!

For more fashion tips, cosplay and DIY, checkout My Cute Bow blog.

Post by Eugenia || www.moobury.com || Etsy || Facebook & Instagram @Moobury

No-sew Upcycled Tee Shirt

BoxyToBraided

Happy Earth Day All! To help you celebrate the holiday and being green throughout the year, I'm sharing a technique that lets you reuse old t-shirts that you can't seem to let go of, yet never wear. This also helps you reduce your material waste and upcycle instead of recycling without needle, thread, or a sewing machine! 

Before we start, grab one (or a few) t-shirt(s) from your drawer or closet  and get ready to breathe new life into your wardrobe. 

All you need for this project is:

  1. A tee shirt 
  2. A pair of sharp scissors
  3. More tee shirts, because you're going to want to do it again!

1. Start by laying your shirt flat, and cutting off the sleeves and collar. You can choose a V-neck, or cut the sleeves a little more if you like a skinnier tank-top strap.  

2. Next cut ten to fifteen horizontal two inch slits down each side of the shirt. Less cuts will give you a chunkier braid; more will result in a finer braid. I settled on eleven since this was not a very long tee.    

3. Now it's time to braid! Reach down into the loop created by your first cut.  

4. and pull the next loop up through the hole. If your loops are a little wide like mine, push the next loop up a little until you can grab it. 

5. Repeat with your remaining loops until you reach the bottom. You will see the braid start to take shape. If you aren't satisfied with the width, shake out your loops and cut more slits. Get creative! Make It your own!

6. When you reach the very bottom of your shirt, cut the last loop in half right at the seam. 

7. Pull the front tab of the last loop through your chain and tie it to the back tab. 

8. Done! Rock your flirty-cute, faux crochet-sided top! 

Post by Coleen Phoenixx

Etsy ° Instagram ° Facebook 


Sewing Tutorial: Rope Bowls

A few weeks ago I wrote about a homey trend that is pretty easy to make, baskets and bowls made of rope.  You can read about it here.  Today I am going to share with you how to make these easy, heirloom bowls.

Materials: for this project I used cotton clothesline rope bought at my local hardware store, Pintchiks. 

*sewing machine

*thread - I used Gutterman brand in natural, yellow and violet

note - the thicker the rope, the faster the bowl will be made.

1. Form a circle by shaping the rope on a flat surface. I started doing this in the air which presented a challenge. When the bowl is about 2" to 3" wide I sew a zig zag stitch across the center in one direction, and then repeat in a second direction.  I set the zig zag on a width of 5 to 6 and a length of 1 to 2.  For the base I use natural color thread. Important note, make sure the rope is feeding from the ground or your lap and moving counter clockwise. 

2.  I took the base out and changed my top thread to a bright canary yellow.  Once the bowl base is my desired size I start to hold the base at a 90 degree angle and continue to feed the rope.  

step 3.

3.  About 2" up the bowl I switched my bobbin thread to a violet purple. This creates a pretty contrast to the canary yellow on the inside.  Once the bowl starts to shape it's easier to hold it with the left hand and feed the new rope with the right hand.

4. Creating the handle. Once you start to reach the end of your rope, take a few inches and curve the handle. At the beginning of the curve sew a backstitch a few times so the handle is secure.  At the end of the handle, repeat, but put the end of the rope on top of the edge.

step 4

These bowls are so easy to make, you can eventually make them larger into baskets and planters.  Experiment with nylon and polyester rope, hot pinks and green jute are next on my list. Perfect for bread, fruit, jewelry, hair ties. The uses are endless! Enjoy!

Tracey

www.traceytoole.com

www.traceytoole.etsy.com


Trend Watch: Rope Baskets

I love baskets! I am always attracted to them. And always tempted to buy them.  Have you noticed lately all of the rope baskets available?  Or rope basket tutorials?  It really is quite easy to make.  Today I have a list of websites showing a variety of rope basket tutorials.  

By looking at the above picture would you be surprised it is put together by hot glue?  The rope is actually cording/piping used on furniture and pillows.  You can find this diy here. 

Another no sew option is from Martha Stewart.  Her team uses flower pots to wrap the rope around.  

marthastewart.com

If you know how to sew there are 2 options you can choose,  Sweet Paul and Elise Blaha blogs have tutorials.  Using a neon pink thread really adds to the pop!  You can find Elise's tutorial right here.

Sweet Paul, who is based here in Brooklyn, takes it one step further. Dyeing! This would be a great weekend project because dyeing can sometimes be messy.  But dip dyeing has such a beautiful effect. dip dye rope bowl project

All you need for the above projects is clothes line rope that you can find at your local hardware store.  Enjoy!

Tracey

www.traceytoole.com  |   www.traceytoole.etsy.com

DIY: Upcycled Skirt

It is that time of the year again and we find ourselves transitioning into Fall. We go into our closets,  take out the sweaters and start wearing layers. As I went into my daughter’s closet and found a few things to donate, I found a couple of pants that still fit her at the waist but are short at the ankles. So I thought to turn them into a skirt, which became the idea for this post! Note that you can do this project with your own, adult size pants. You will need:

A pair of old pants

Your sewing machine

Fabric scissors

Seam ripper

Coordinating thread

Basic sewing skills

1.a. Decide where you would like your hem height to be (above or below the knee, etc) and mark it. Lay the pants completely flat on a flat surface. Cut the legs off where you marked the leg. Be careful to cut in a “curve” and not straight across (image above)

1.b. Use your seam ripper to take apart the seam on the inside leg.  When you get to crotch area, carefully rip the seams as close to the zipper as possible. It may take a little time to do this but it will be worth it.  Keep the bottom part of the legs that you just cut off for the next step.

2.a. Use your scissors to cut open the legs (the pieces you just cut off) along one of the seams (side or inseam, it doesn’t matter). No need to rip the seams, just cut as close to the seam as possible. The top part of the pants (which will become your skirt) will have two sort of flaps, at the front and back, in what used to be the inseam of the leg and crotch. Lay the pants flat, overlap the crotch flaps one on top of the other and put one of the pieces of fabric from the cutout legs (legs you cut off) under the opening. Make sure the flaps are on top of that piece of fabric, laying flat, fold in the edges and carefully pin the layers together.

3.a. Time to sew! Top stitch along the pinned folded flaps.  You can use a thicker, contrasting thread color for fun - you gotta show off your work, right? I used a couple strands from a DMC embroidery floss. Cut the excess fabric on the wrong side of the garment (middle image above). 

3.b. Repeat steps 2.a through 3.a to finish the back of the skirt. Once front and back are finished, your skirt is ready! You can wash and dry it to fray the hem.

OPTIONAL:

Step 2.a. optional: Instead of using the cut out leg to insert under the opening at the front and back of the skirt, you could use a different fabric to add contrast. Maybe use a patterned fabric or different color fabric but you should find something that is the same fabric weight as the rest of the skirt.

Step 3.b. optional: You may decide to finish the hem differently. You can fold in the hem and top stitch it but you must remember to add an extra 1.5” to 2” hem height when cutting the pants on step 1.a. You can also top stitch lace or ribbon at the edge of the hem. However, it must be a narrow width as your hem is curved and the lace or ribbon will lay flat,  possibly producing a puckered effect.

Now that your skirt is ready, wear it, layer it with tights this Fall and strut it around next Summer. You will be so happy with the result and best of it all, you did it all yourself and reused a piece from your closet.  This is a great project to reuse your favorite pair of pants and to create a unique piece of clothing you can wear all year around.  Enjoy it, have fun and happy sewing!

Natasha K.

ETSY // FACEBOOK // INSTAGRAM


DIY: Fall Patchwork Kitchen Trivet Tutorial

It's National Sewing Month! Did you know that? Did you know it was President Regan who started  National Sewing Month in 1982.  He wanted to celebrate and honor the importance of home sewing in the United States.  If you want to learn more about National Sewing Month check out the National Sewing Month website.  However I am here to show you how to make a Patchwork Trivet just in time for the beginning of tea and soup season.   This is a good project for a beginner or intermediate but you do need to know how to use a sewing machine.

Materials:

scissors or rotary cutter

pins /  iron

double wide bias tape 

cotton woven fabric scraps adding up to 9" square

Insul Bright batting

wool - I use Mary Flanagan wool that comes in beautiful colors and patterns 

1. Cut your cotton woven fabric scraps into 3" squares.  I used 3 different patterns/colors. 

2. Arrange your squares into the design you would like for the top part of the trivet. 

3.  Once you decide on your design, take 2 squares and lay them face to face, pin them and sew 1/4" seam allowance on one side. 

5. Remove the pins and with a hot iron and the back side facing up, press the seam to the darker fabric side. 

6.  Arrange your pieces again into your desired design.  You can see in my photo I sewed 6 pieces together to create 3 2 patch blocks.  My design is 3 swatches across, 2 are sewn and the 3rd isn't.  Now I will sew a third square onto each row of 2.

PATCHWORK TRIVET TUTORIAL 6.png

Continue this step with the other 2 rows of 2 squares each and this will complete your trivet top.

Next Friday will be part 2 of this tutorial and I will show you how to make your quilt sandwich and  complete the trivet. 

Have a great weekend! And please ask any questions or comments below!

Tracey

www.traceytoole.etsy.com

www.traceytoole.com