Part II DIY Fall Kitchen Patchwork Trivet

Last Friday we demonstrated a tutorial of how to make a patchwork trivet for your kitchen. Today we will finish it up with part II.  If you missed part I you can find it right here.   I know with the change of weather I am ready to start having hot coffees and warming teas.  

Last week's last step was making the patchwork top part of the trivet. It should look like this. 

1. The bottom row is sewn to the middle row, be sure to match seams and press with steamy iron.  Then sew the middle row to the top row. Repeat same steps.

2. SQUARE IT UP.  This means you need to cut the sides to make sure it is even.  It's ok if it ends up being smaller than 9" square or not a complete square.

3. Step 3 you are going to start making the quilt sandwich. Take your wool, place your batting on top of that, then your trivet top on top face up. 

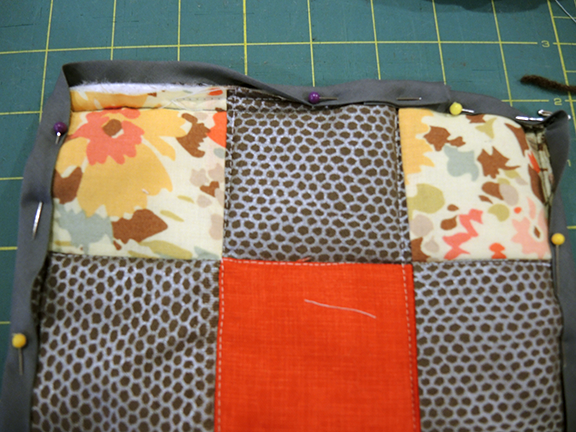
4. Pin the layers together and sew along the seams. You can use regular straight pins or basting pins.  It's good to use a Walking Foot but if you don't have one that's ok. 

5. Attaching the bias tape binding. When you first start to attach it you need to fold over one short end raw edge about a half inch.  

Be sure to fold the short raw edge as above. 

6.  Sew a half inch seam allowance around all of the edges. 

7. Fold raw edge and wrap to top side of trivet. Pin. 

step 7B


8. Sew an edge stitch.  This is a stitch right along the grey binding. 


Step 9. Done! Have a cup of tea!

final trivet 2 colors.png

If you have any questions please let me know.  Next tutorial will be the Apple Picking Tote on October 16th. 

Have a lovely weekend! 

Tracey Toole

www.traceytoole.etsy.com   |    www.traceytoole.com

DIY: Fall Patchwork Kitchen Trivet Tutorial

It's National Sewing Month! Did you know that? Did you know it was President Regan who started  National Sewing Month in 1982.  He wanted to celebrate and honor the importance of home sewing in the United States.  If you want to learn more about National Sewing Month check out the National Sewing Month website.  However I am here to show you how to make a Patchwork Trivet just in time for the beginning of tea and soup season.   This is a good project for a beginner or intermediate but you do need to know how to use a sewing machine.

Materials:

scissors or rotary cutter

pins /  iron

double wide bias tape 

cotton woven fabric scraps adding up to 9" square

Insul Bright batting

wool - I use Mary Flanagan wool that comes in beautiful colors and patterns 

1. Cut your cotton woven fabric scraps into 3" squares.  I used 3 different patterns/colors. 

2. Arrange your squares into the design you would like for the top part of the trivet. 

3.  Once you decide on your design, take 2 squares and lay them face to face, pin them and sew 1/4" seam allowance on one side. 

5. Remove the pins and with a hot iron and the back side facing up, press the seam to the darker fabric side. 

6.  Arrange your pieces again into your desired design.  You can see in my photo I sewed 6 pieces together to create 3 2 patch blocks.  My design is 3 swatches across, 2 are sewn and the 3rd isn't.  Now I will sew a third square onto each row of 2.

PATCHWORK TRIVET TUTORIAL 6.png

Continue this step with the other 2 rows of 2 squares each and this will complete your trivet top.

Next Friday will be part 2 of this tutorial and I will show you how to make your quilt sandwich and  complete the trivet. 

Have a great weekend! And please ask any questions or comments below!

Tracey

www.traceytoole.etsy.com

www.traceytoole.com

Kitchen Finds from your local Etsy Team

We are nearing the end of another season.  After the third heat wave  New York City has experienced, I think most people are ready to start the fall season.  A time to clean house, switch out wardrobes, harvesting time, pickling, apple picking, pumpkin picking and jam making.  You may realize you can use some new kitchen supplies.  

From titiluli, tea towels are such a great hostess or host gift.  This adorable tea towel with honey bees is perfect for the tea drinker or bee lover. 

from Vicki Finkel Ceramics

Perfect apple red color vase/pitcher  to complement your table or counter top from  Vicki Finkel Ceramics.  Raised bottom, handle and fired with a red and yellow glaze in a gas reduction kiln. 

Set of three bowls from Romi Ceramics to hold sauces, jewelry or any other precious little items you may have.  Cast in two colors and they nest in each other.  Perfect for those small kitchens where space is treasured.

It's easy to shop local on etsy, just visit etsy.com and type in the search button etsynyteam  or click here.

Have a great Labor Day Weekend!

Tracey Toole

www.traceytoole.etsy.com