Can I Make This?

When I was a young girl my mother called me expedient, meaning I was more interested in finishing a craft than I was in doing it correctly. Maybe so; I'd get excited about the idea of the finished product and didn't always have the patience to work with small pieces, wait for glue to dry, do things in the proper order.

After reading about the young Norma Kamali and how she would baby powder her shoes to make them extra white, I once glued glitter to a pair of my own shoes. Norma and I met the same ending: she left little white outlines of chalky baby powder everywhere she walked in her classroom, and I trailed glitter where I walked (since I didn't use the correct kind of glue.)

This was frustrating to my mother who was an accomplished craft person in the areas of embroidery, painting and sewing. She once nearly lost her mind "teaching" myself and two girls from my girl scout troop how to use a Singer machine to make nightgowns for the sewing merit badge.

The result back then was that my finished products didn't last very long. (Although I think I did wear that flannel nightgown with the little blue rosebuds on it until it fell apart.) But old habits die hard and while I am now more patient with myself when making things, it's still true that when I see a DIY project on the web, my mind goes straight to this thought: How would I screw THAT ONE up?

This story goes to the issue of how easy a maker thinks a project is, and how easy the inexperienced "student" finds it to be. I know that as a food editor at Chocolatier magazine, we always assumed the reader/baker had no experience. It was agonizing sometimes to edit recipes in such detail, but I still have all my old issues of the magazine because you couldn't go wrong with a single recipe from Chocolatier, while the average recipe in a newspaper article is so full of errors it's hardly worth spending the money on ingredients because the dish is often likely to fail due to a lack of recipe testing or editing. So this article on DIY projects by Daily Candy editor Zoe Schaeffer caught my eye:

"Skeptical of DIY fashion projects? So were we—until we came across the clever ideas from these top style bloggers. From suede booties to accented aviators, their innovative creations look cool—not crafty. Don't believe us? Here, 13 DIY styles that look as chic as the real thing."

This one does not seem so difficult, right?

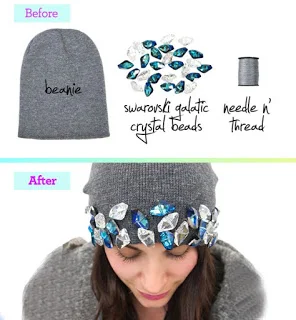
"Steal the bedazzled beanie style from the House of Holland runway show with help from Erica Domesek of PS I Made This," reads the article. "Arrange plastic gems, buttons or beads on an old beanie in various cluster designs," she says. "Once you've decided on a pattern, use it as a guide to follow and simply sew the embellishments into the fabric with a needle and two pieces of thread."

The success of this project depends on the ability to sew the beads on in the correct jaunty angle. I think I would get five sewn on, realize I had 27 more to go, and give up. Also, I'm pretty sure something awful would happen when I put the hat on and the s-t-r-e-t-c-h made the beads all move to weird places. How about this one?

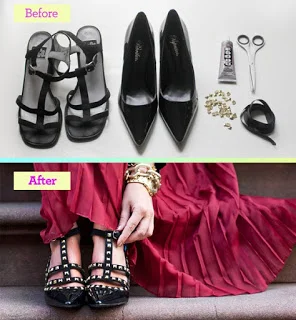
"Pining for designer T-strap studded heels? This pair could easily be mistaken for the real thing. To create them, "Line the edges of a pair of pointy-toe kitten heels with black ribbon by gluing, making a few slits when rounding the front to create the curved edge," says Radosevich. "Next, cut the straps off a pair of old sandals and attach them to the kitten heels by gluing a piece of ribbon to connect the strap and shoe." Once dry, glue gold or silver studs onto the straps for a runway-ready finish."

I'm with Radosevich until she cuts the straps off a pair of old sandals. I just see myself losing the straps when the glue failed and hobbling around in my half-designed shoes.

Not sure I need to go on, you get the idea. Creating something not only requires the skill to do it, but the confidence that you can do it without screwing it up. And confidence comes from success. So, start small, buy the right glue, and craft on!

Susan/Wink and Flip Wink and Flip

Fabric Covered Buttons

As you can see, I've got a lot of buttons in my stash. Unfortunately, sometimes none of them will work for a particular crafty project I may be working on. Last September, I decided to finally replace a missing button on a jacket. I headed down to a button store in the garment district and ended up buying a button for $3. Yes, $3 for one button. I found the price to be ridiculous, but I had no choice. A few months later, I came across instructions online to create fabric covered buttons....so I will never pay $3 for a button again!

First, pull out your stash of fabric scraps. It doesn't take a lot of fabric, so there is probably something in the fabric stash that will be useful. I decided to use the greenish-colored fabric (seafoam) because I had no buttons that matched the fabric.

Measure the distance from the edge of the button to the middle of the button. You want the fabric to be able to reach the middle so you can completely cover the button.

I traced a circle on the fabric around the button, making sure that there was at least 1/2 inch extra all around.

Then, I cut the fabric. My measurements were pretty close, but it wasn't necessary to be exact.

Taking a needle and thread, I used a running stitch (I think that's what it's called) and stitched along the perimeter of the fabric circle.

After placing the button in the middle of the fabric circle, pull the thread taut so the fabric gathers around the button and covers it completely.

You can even trim a bit of the fabric around the outside of the stitches to reduce the amount of bulk behind the button. You don't want too much fabric because you want the button to lay as flat as possible when you use it.

Continue to stitch up the fabric until it is taut around the button. Knot off the thread, and you are done! A beautiful button for whatever project you are working on!

Until next time....happy crafting!

Nordea nordeasoaperie

Liberty of London Fabrics

Liberty of London new collection inspired by the Chelsea Flower Show

Many people who are sewers or quilters know of Liberty of London fabrics. Those who do seem to love them.  As a designer with a background in woven fabrics I appreciate the quality and the design, and personally I think they are absolutely gorgeous. Grant it, they are expensive, but with good reason.

Their fabrics are designed by English artists, the Liberty archives date back to 1875, high quality cotton is used, the process is intense and they are manufactured in England.  With fabric manufacturing this is where the majority of the cost is, where it is manufactured, ( visit this 2 minute plus video by Mollie Makes about the printing process of Liberty). When you buy this fabric you are not supporting child or unfair wage labor.  Rather these are experienced technicians earning an honest wage in England.  So how much is it a yard? On average in the US it runs about $36 a yard. But believe me, if you purchase it and make something with it, you will have it forever.

Liberty just came out with their new collection, inspired by the Chelsea Flower Show. Liberty is known for their floral prints.  What I love most are their prints that are not your stereotypical flower print.  Each fabric has a story and background. If you would like more info you can visit their website and click on each fabric link and they will tell you what this fabric is about.

One of my part time jobs is working at Purl Soho, a fabric and yarn shop in Soho NYC.  I emailed my manager yesterday to find out if we are getting any of the new Liberty collection. Only 3 stores in NYC carry Liberty. She said we were but wasn't sure when it was arriving.  Late last night I received a text message, the fabrics arrived last night.  Today I go to to work and can't wait to see the new collection in person! I wonder which ones the store will be selling.

Are you familiar with Liberty fabrics? Have you sewn with them? What do you think?

Tracey Toole

http://www.etsy.com/shop/traceytoole

http://traceytoole.blogspot.com/

Sandy Craftalong

I hope everyone is doing well and on the road to recovery post-Sandy. I know that many of us East-Coasters were affected (myself included) and my thoughts go out to all of the families that are still suffering from the destruction that Sandy left behind.

When I stumbled across this project I thought it would be perfect for the crafty readers of this blog. Two NY-based craft bloggers have organized a craftalong to make warm items to donate to Sandy victims. Items they are looking for include hats, mittens, scarves, blankets, socks and sweaters, and these items can be knit, crocheted, or sewn! If you have any time and resources to spare, I encourage you to consider participating in this craftalong. The sooner you can make something the better, as they're hoping to start passing out donations within a week or less. If you'd like to find out more information, click through to this post!

By Nnenna of star-crossed smile

Egghead Learns to Sew, Part VI

Today I start applying machine-sewing to the material I intend to work with, namely, felt! This involves learning about types of thread, needle sizes, and a few key machine settings.


Fabric, Thread and Needle -- Combining Heaviness, Strength and Size

Felt doesn't appear in the Fabric, Thread, Needle Chart in my Instruction Manual but I'm approximating to be somewhere in the neighborhood of jersey and tweed in terms of heaviness. I used my outfit of denim and jersey (jeans and a t-shirt) to make this determination. Felt is thicker than jersey but not as dense as denim, so... best guess.


My Chart describes thread in terms of cotton, fiber and silk. None of the thread I own states these as its components; it's all just polyester, if it even says what it is (a lot of it is inherited). Hmmm. This is the point at which I had to go beyond the Instruction Manual for information. I learned that the important thing is to match the type of thread to the type of fabric, not just in terms of color but also strength and stretchiness. Although the best source I found (Tying it All Together: All You Need to Know About Thread) didn't specifically mention felt, I gleaned from the wide range of fabrics it included in its more extensive fabric-thread-needle chart that polyester would work just fine with felt.

On to needle size. My Chart said to use a needle sized between 11 and 14. I wasn't sure what size needle was already in the machine, though I deduced from the sizes of the needles included in my little box of sewing machine accessories that it was probably an 11. But what a problem it could be if I was wrong, so I decided to take the needle out and with a magnifying glass and a lot of light, read the teeny-tiny number engraved on the rounded side of the base of the needle. To get the needle out, I followed the directions for "Changing Needle" in the Instruction Manual. Using the little screwdriver that came with the machine, I loosened the needle clamp screw. Then I gently pulled down on the needle until it was free.


I couldn't make any sense of what the teeny-tiny engraved text said for the longest time, until I realized I was looking at it upside-down. That's how tiny it was! Probably the glare from the additional light I had shining on it didn't help. 


In any case, the needle turned out to be a size 11, as I suspected. According to my Chart, it would likely work fine with felt (it recommended size 11-14). 


Pressure of Presser Foot and Length of Stitches -- Setting the Settings

For heavy fabric such as I determined felt to be, my Chart said to use heavy pressure, so I pushed the pressure regulator all the way down.


As for the stitch settings, I set the selector dial to straight stitch (versus a zigzag stitch). For this type of stitch my Chart recommended a stitch length of between 0.5 and 3. I set this dial to 3.


I turned the machine on, depressed the foot control, and clickety-clack, off I went a-sewing on felt! I planned to make a little pillow, in part to test how much stuffing I could stuff into something and still be able to sew it up on the machine. Stuff it too full and there's not enough fabric to get under the presser foot.


Considering that in any given project I'll probably be combining machine-sewing with hand-sewing, I'll probably opt for a longer stitch so that they match, setting the dial to 4 instead of 3. I did try this, not on the pillow but on a scrap of felt, and it worked fine. For decorative purposes I may also want to use a thicker thread than the multi-purpose polyester I used today, requiring further machine settings to be investigated and duly adjusted. More on that to follow.

Until then --


Linda
Purty Bird

Egghead Learns to Sew, Part V

Hooray! Today it all comes together and I sew a couple of pieces of fabric together!

I gleaned from the Instruction Manual how to do this based on its coverage of the topic  "Changing Sewing Directions," rather than by following specific steps because this was the topic that immediately followed "Drawing Up the Bobbin Thread."
Doing so turns out to have been a good thing, as the section that I would have expected to follow "Drawing Up the Bobbin Thread," namely, "To Start Sewing," which I eventually found a few sections  later, was inadequate and even nonsensical: When I later followed those instructions, the thread got all tangly and/or the machine simply did not respond. I found Step 2. to be particularly confounding.


In any case, I hope that the steps to start sewing that I gleaned from the "Changing Sewing Directions" aren't bad for the machine or otherwise ill-advised. (Please do tell me if they are!)

To Start Sewing


This is obvious, but since I haven't used them in awhile, it might be worth noting that before starting to sew I attached the foot control the sewing machine and then plugged it into a power source.


After threading the upper thread, drawing up the bobbin thread and pulling both threads toward the back of the machine, I positioned the fabric that I wanted to sew under the needle, which was raised to its highest position.


Turning the hand wheel clutch slowly toward me, I lowered the needle into the fabric. Then I lowered the presser foot.


I pressed down on the foot control and woohoo! I was sewing!


When I got nearly to the edge of the fabric I stopped. With the needle in the fabric, I lifted the presser foot and pivoted the fabric around the needle to sew down the next side of the fabric.


I had the idea that I'd make a pincushion or tiny pillow of some sort as my first sewing project so I left the last side of the fabric open (the remaining side of the fabric was folded over). Thus, when I got to the edge of the second side of the fabric I was sewing, I stopped and followed the directions in the Instruction Manual for finishing a seam.


Specifically, pushing down on the reverse lever, I sewed backwards for about two inches. Then, turning the hand wheel clutch slowly toward me, I raised the needle to its highest position, lifted the presser foot, and pulled the fabric out toward the rear of the machine. As instructed, I cut the threads using the thread cutter on the back of what I think is the needle bar, but this was awkward so next time I'll just use scissors.


Next, I have to learn about different kinds of fabric and thread, and corresponding settings on my machine.

Until then --


Linda
Purty Bird