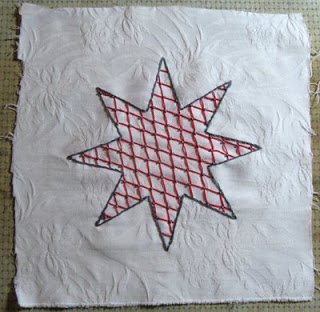
Tutorial Tuesday: String Art Embellishment
When it was time to decorate a raffle box for the Spring Handmade Cavalcade, I really wanted to take advantage of the existing structure of the lunchbox. After much trial and error, I hit upon the idea of using the stitching holes as the basis of the design. During elementary school, one of my teachers had been in an art project rut that consisted of making string art for every single month. Apparently, time has made it fresh to me again, since I was pleased enough with the outcome to want to share it with you.

String art has its origins in activities invented at the end of the 19th Century to teach mathematical ideas to children, and became popular as a decorative craft in the late 1960s. Though straight lines are formed by the string, the angles and metric positions at which strings intersect give the appearance of curves.
For this project you need:
An item to embellish that has holes in it (holes can be configured as an angle or an arc)
Embroidery Thread
Needle
Glue (optional)
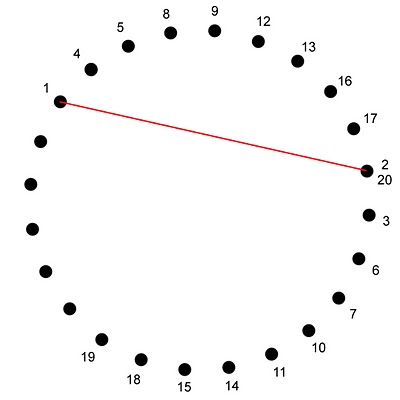
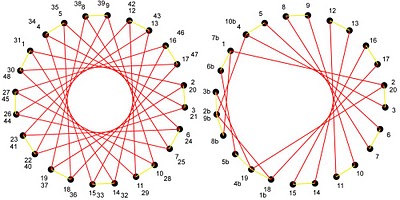
Thread the longest amount of thread that you think you can handle onto the needle (I use my full armspan, so about 5 feet). Tie a large knot and go from the back of the piece to the front at point #1 on the diagram. At this point I also like to add a dab of glue on the knot to keep it in place as well.

Follow the number patterns from 1-20 going from the back to the front on the odd numbers (1, 3, 5, etc.), and from front to back on the even numbers. Keep the thread taut as you go to keep the lines straight and neat. If you run out of thread, knot off on the back, and start again going up at the next odd number with a new piece.
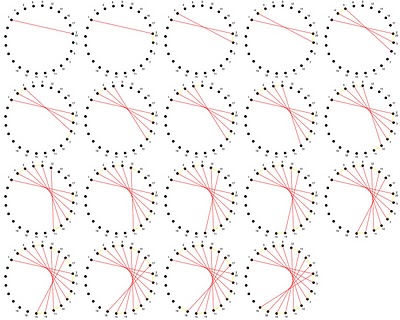
 Here is a step-by-step diagram to see how the picture emerges. Red lines are on the front of the piece, and the yellow lines are the shorter stitches hidden on the back. Click on the image to enlarge the diagram.
 Now that you've completed the pattern, just knot off on the back, and if add a little dab of glue to anchor it in place.
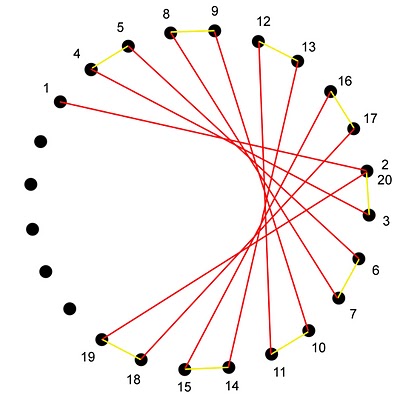 You may have noticed that the arc that we've made could have continued the rest of the way around the circle. Alternately you could make an asymetrical design by making a different distance between a second set of points 1 and 2. I find that string art is so quick and easy to do (and undo) that experimentation is highly rewarding!
 I would love if you could share any ideas or completed projects that this tutorial has inspired you to create in the comments section.
 ~Kari
~Kari
http://ikyoto.etsy.com/
String art has its origins in activities invented at the end of the 19th Century to teach mathematical ideas to children, and became popular as a decorative craft in the late 1960s. Though straight lines are formed by the string, the angles and metric positions at which strings intersect give the appearance of curves.
For this project you need:
An item to embellish that has holes in it (holes can be configured as an angle or an arc)
Embroidery Thread
Needle
Glue (optional)
Thread the longest amount of thread that you think you can handle onto the needle (I use my full armspan, so about 5 feet). Tie a large knot and go from the back of the piece to the front at point #1 on the diagram. At this point I also like to add a dab of glue on the knot to keep it in place as well.
Follow the number patterns from 1-20 going from the back to the front on the odd numbers (1, 3, 5, etc.), and from front to back on the even numbers. Keep the thread taut as you go to keep the lines straight and neat. If you run out of thread, knot off on the back, and start again going up at the next odd number with a new piece.
Here is a step-by-step diagram to see how the picture emerges. Red lines are on the front of the piece, and the yellow lines are the shorter stitches hidden on the back. Click on the image to enlarge the diagram.Now that you've completed the pattern, just knot off on the back, and if add a little dab of glue to anchor it in place.You may have noticed that the arc that we've made could have continued the rest of the way around the circle. Alternately you could make an asymetrical design by making a different distance between a second set of points 1 and 2. I find that string art is so quick and easy to do (and undo) that experimentation is highly rewarding!I would love if you could share any ideas or completed projects that this tutorial has inspired you to create in the comments section.~Karihttp://ikyoto.etsy.com/